
Summertime and grilling go hand in hand. I love grilled food and find it so helpful as the cook, to be able to delegate parts of the meal to another person at an outdoor kitchen (instead of trying to share another burner or countertop). I also think it can be a great bringer-together of people, when grilling with company.
A few weeks ago our family went to the beach with friends. We eat-in for most of our meals. Not only is it more convenient and MUCH cheaper, but we find it FUN and one of the highlights of our week! Our friend, Rich, is usually the lead griller. (Not only is he an incredibly talented, creative, professional photographer, but also a fantastic cook.) We try to find something to put on the grill most every night. When I mentioned our vacation grilling tradition to some friends on a walk, my friend Lynn asked if I would write a post to share some of Rich’s tips! What a great idea! I could use the tutorial too, since I’m usually not watching the magic happen grill-side.

The Grill Master and family
So, during the week, I tried to pry out of Rich his philosophies, techniques, tips and strategies for grilling. I asked Dave and Asher to photograph and take notes while Gretchen and I were inside cooking each evening. We were able to get some notes and photos. (Keep in mind I was trying to hold back from turning our meal into a photo shoot, so the “at the dinner table” photos aren’t lit or styled, just quickly snapped before it was devoured!) After our return home, I gathered a lot more information from Rich. As with many good cooks, Rich grills *intuitively*, which is incredible and yet makes it hard to translate to another person.
Thankfully he gave us these helpful ideas (see our conversation below) :
1. Me: There seem to be 4 main components to consider when grilling: Seasoning, Heat, Timing/Testing, & Resting. Will you talk about these?
Rich: Seasoning – You can season meat with either a marinade or a dry rub. For a marinade, I typically use olive oil and lemon juice with garlic and worcestershire. For a dry rub, my recent favorite is just plain salt and pepper – coarse for both. I salt and pepper each side heavily, and leave it at that.
(Rich and I agree that their Salt and Pepper Grinders are the best!- see link to their favorite at the end of the post.)
Heat – I turn the grill as hot as it goes – literally, I have a a Charbroil Infrared Grill that gets super hot. I turn it to HIGH and keep it on HIGH. The more BTU’s on your grill the hotter it can go. Using the HIGH setting sears the meat at a high temperature so that the inside doesn’t overcook and the juices stay in.
Timing/Testing – Timing is unique to each item you’re grilling. It’s best to undercook rather than overcook because the meat/veggies will continue to cook after you take it off the grill if you wrap them in foil! I almost never cut into what I’m grilling until I’ve let it rest for a bit because I know it will still cook even off of the grill. I cut into it 10 minutes or so after allowing it to rest in foil (see below) to see if it is cooked properly. I don’t use a thermometer, though I know many people do, it just seems like the temperature varies but it doesn’t always mean it’s cooked the way I like it.
Resting in foil – When I take an item off the grill, I wrap it in foil – lots of foil. We go through 1 box of foil every couple of weeks. I wrap the foil completely around the item at least twice. I also use heavy duty foil, the regular is too thin. I typically allow any meat to rest in foil for about 10 minutes before I unwrap and cut into it to check done-ness.
Once you’ve let your meat rest, open it up and make a cut into the thickest part of it (the part of the meat that would take the longest to cook). With chicken, you want the inside to be white; with beef and pork, you are looking for the outside to be dark in color, but the inside to be pink and not overly bloody (that’s how I like it); and with your fish, you want it to be flaky with a fork. Also, chicken and fish is not done if it is at all slimy.
2. Me: Will you share the play-by-play instructions for these yummy things we grilled on our trip?
Rich: Sausage and Veggies-
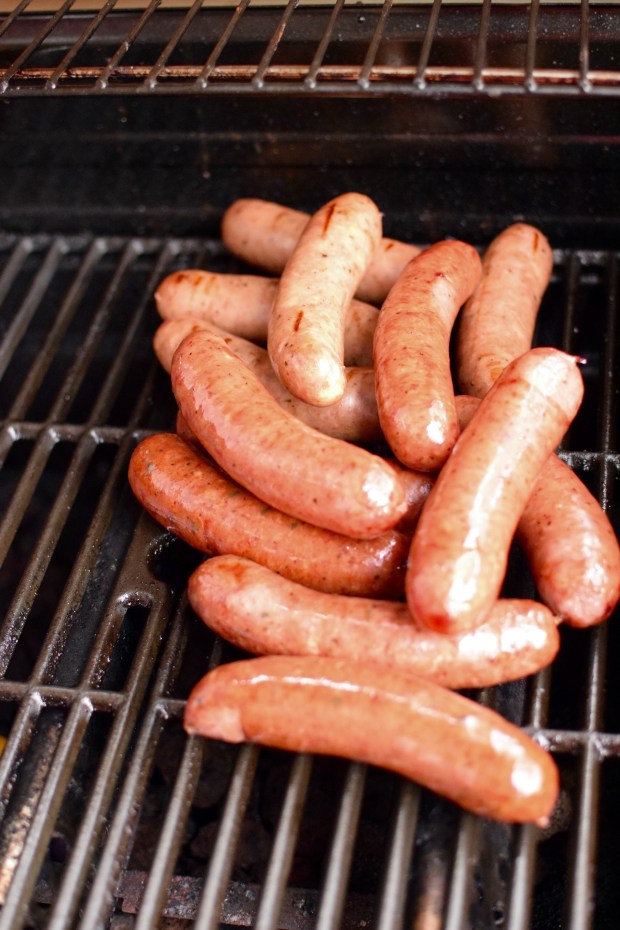
For Sausages: Grill them on HIGH, but on indirect heat which means not directly over the flame – I usually turn on one burner and keep the other off, and put the sausage over the burner that is off.
It’s important not to overcook sausage because the casings can burst and the sausage will get dry. The indirect heat helps with this. I watch the sausage constantly – flipping and moving them around making sure to get at least four minutes on each side, with a total cooking time of around 8-10 minutes. You can go for char marks on the sausages, but they are not necessary. Keilbasa is an easy sausage to get those char marks on.
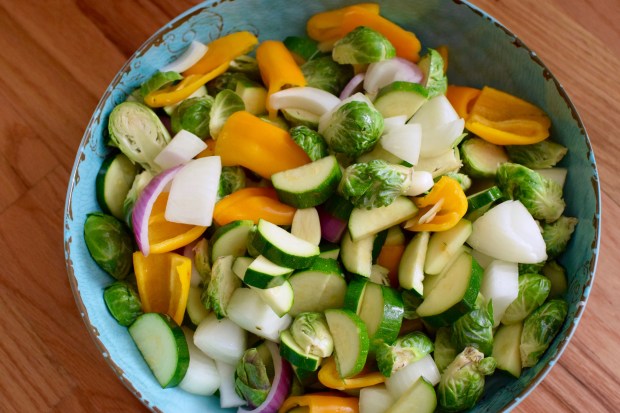
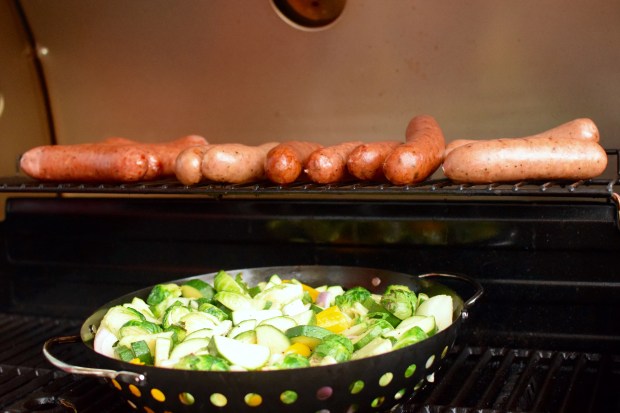
 Veggies- (Cut up zucchini, squash, onions, garlic, bell peppers, asparagus, etc.) I always wrap veggies in foil with olive oil and lemon juice, salt and pepper, leaving the foil open on top so I can watch them. I cook veggies on the top rack, away from the flame or if you use a grill wok, you can use the main grill surface. I toss the veggies with tongs, stirring them in the foil every few minutes to keep the oil/lemon juice moving and to get an even cook. Most veggies take 10-15 minutes if you have sliced them fairly thin – just watch for translucence and some char. Onions cook quickly; peppers a bit longer. Zuchini and squash cook fast also, but potatoes, peppers, asparagus are all a bit slow.
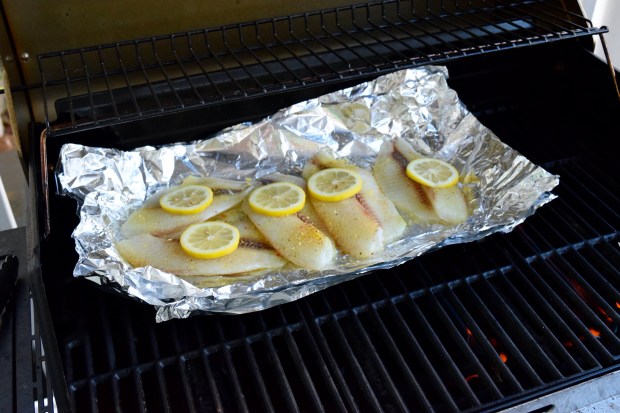
Fish– Cook fish in olive oil and lemon juice in foil just like veggies. You can put the fish on direct heat (HIGH). Watch it carefully and flip every 3-4 minutes. You can tell the fish is cooked by the color (no longer translucent) and flakiness. You probably don’t want to grill fish for longer than 8 minutes. It goes quickly!

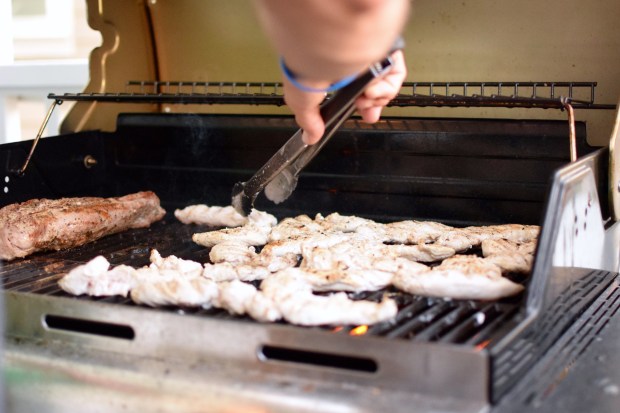
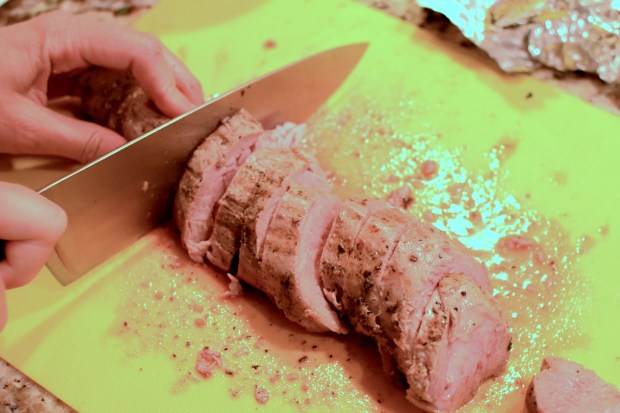
 Pork Tenderloin and Chicken – I salt and pepper pork tenderloin and chicken really heavily and then put both directly over the flame on HIGH. I rotate and flip tenderloin and breasts every 4 minutes or so for a total of 12 to 16 minutes. Then I run it inside, wrap it up really well in foil, and let it sit for at least 10 minutes. I then check for done-ness.
It is important to note that with chicken and pork, size matters. Smaller pieces of meat will cook more quickly than larger pieces. The times I’m giving here are for your average size boneless skinless chicken breast from the grocery store and for a pork tenderloin that would feed 2-3 people.
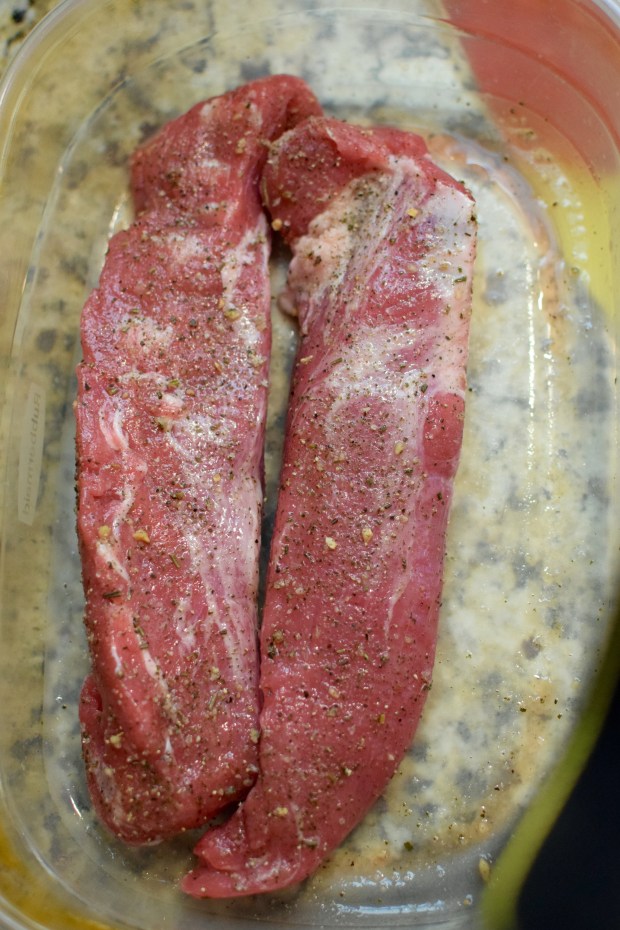

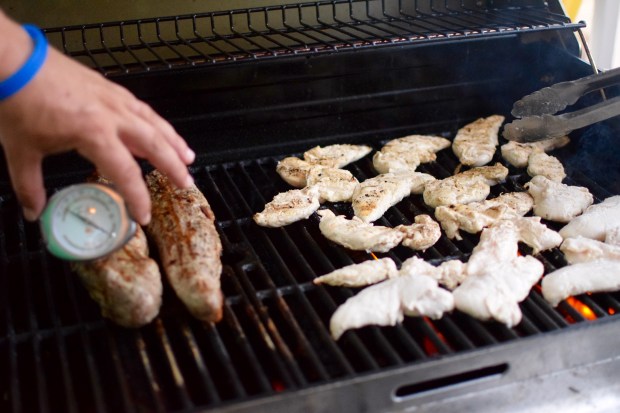
Rich deviated from his “no thermometer”cooking on our trip with this pork tenderloin, since it was not his normal grill and with a piece this thick, wanted to ensure the inside was done.
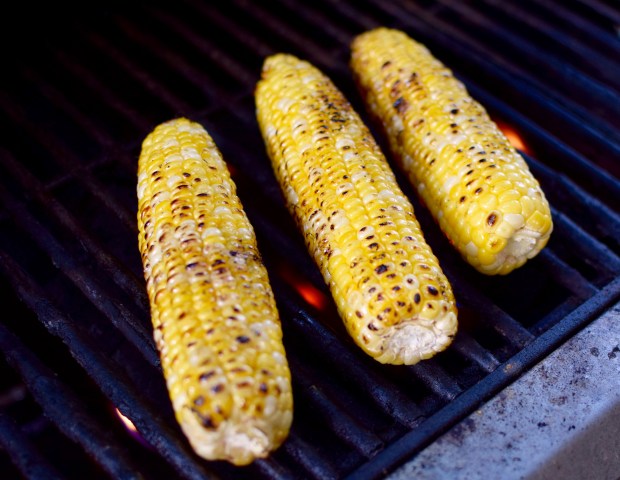
Corn on the Cob – I shuck the corn and coat it with olive oil. I put the ears on HIGH heat over the flame and rotate them as they pop (like popcorn). They will char, so watch for that – you don’t want too much. Turn the corn as it pops (so you are turning pretty regularly). I cook it until I have enough char marks on it for my taste – if you’re getting any char on it, you can know that the corn is ready to eat. So once you get the char, you are really just grilling it the way you like it (sort of like a marshmallow when making s’mores – do you like it black, charred a little, etc?). I wrap corn in foil until dinner is on the table and then we butter and salt it and it’s ready to go!
Click HERE for Printable Instructions
3. Me: Any tools or resources that you recommend?
Rich: I prefer tongs when I’m grilling. Forks pierce your meat and let the juices out. Tongs are easier to use than a burger spatula because I can be more precise when I’m flipping and rotating items. I have several pairs of tongs, but I like the ones that are all metal. I don’t want any rubber on my tongs when I am grilling.
I use canola spray on the grill grates when I’m doing any grilling. I always spray the grill after it’s on and set to HIGH, but before I put the meat on.
I also think a really good set of salt and pepper grinders are key for grilling because I rely so much on coarse salt and pepper for seasoning.
Our favorite are Kuhn Rikon Salt and Pepper Mills found HERE

Me: THANK YOU Rich (and Gretchen, as our scribe) for these helpful tips. They are simple and confirm what I believe, that simple, good ingredients and techniques are often times the best!
And thanks to Dave and Asher for assisting at the grill, and Asher for the photography.

Asher – also capturing the sunset!
In case you wonder what we did with these lovely grilled items, here are our Menus of the Meals we made: (I’ve included some links to recipes from previous posts that we utilized.
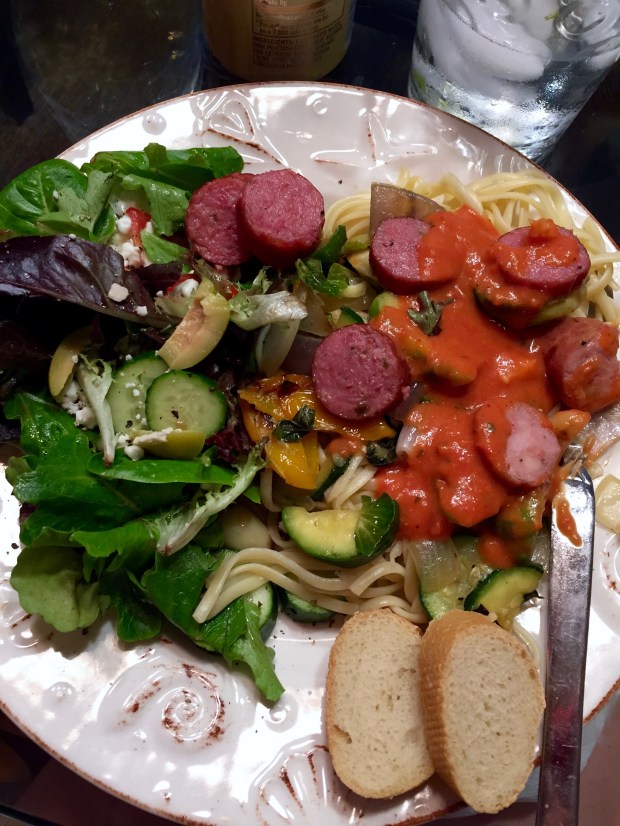
- Grilled Veggies and Grilled Sausage (we used Apple Chicken, Beef and Jalepeno Beef) with Linguini Pasta, Red Sauce (we used Classico Vodka Sauce) topped with Goat Cheese or Parmesan Cheese
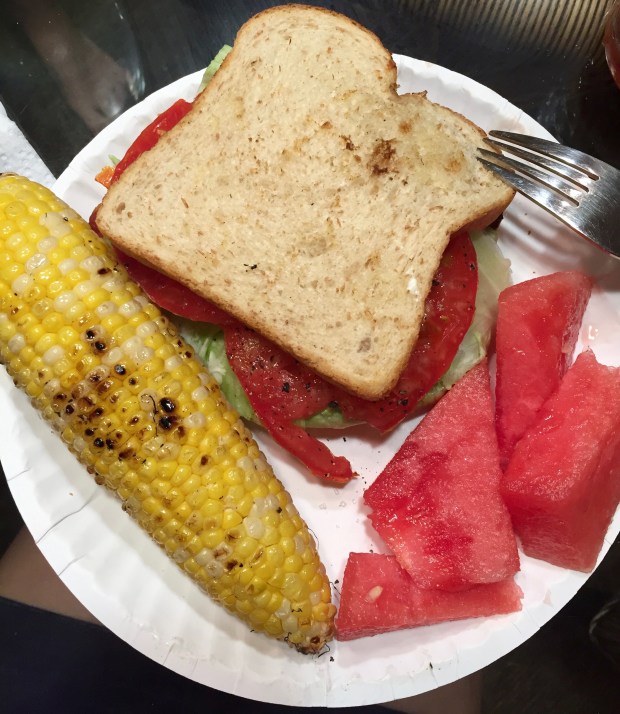
- BLTs with Grilled Corn on the Cob and Watermelon
- Fish Tacos (with Grilled Tilapia)
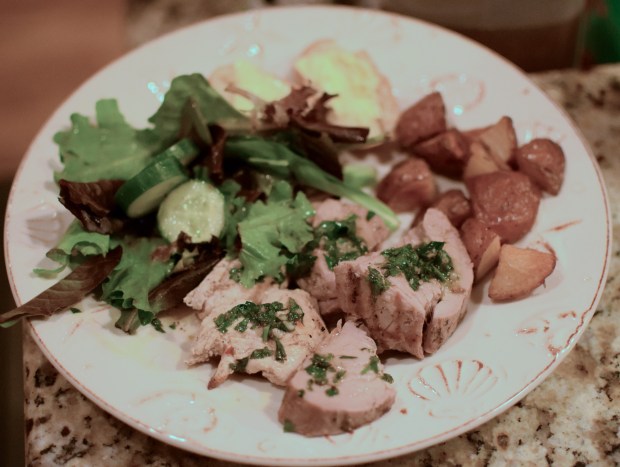
- Grilled Pork Tenderloin and Chicken with Chimichurri (we should have doubled the batch, as we were dipping everything in it) with Green Salad, Roasted New Potatoes, and Crusty Bread
Get your tongs, coarse salt and pepper, thick aluminum foil, and hit the grill!

Yum!!! Now I don’t have to menu plan for the week! 🙂 Thanks Rich!
LikeLike